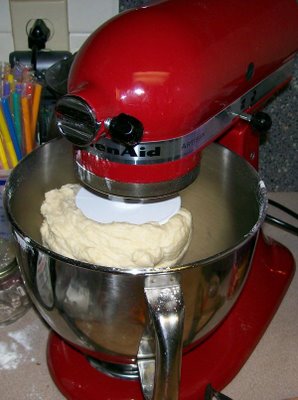
For a long time I've been wanting to make my own Chicago-style deep dish pizza. Two nights ago, with the help of the mixer, I got my wish. Here's how it all went down. I used this recipe, which I'll annotate with pictures.
First, there's the mixing of the ingredients to make a batter; then you add the remaining flour to turn the batter into a dough. If you've ever had the fortune (or misfortune, as the case may be) to work at Pizza Hut, this dough turns out to be slightly less sticky than Stuffed Crust dough, but it's pretty close to that.

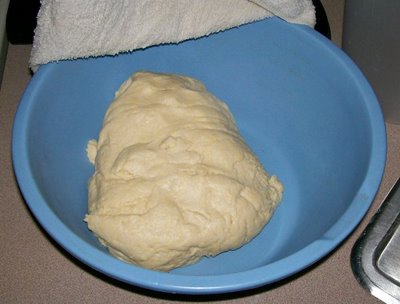
The recipe says to put it on the counter to rise and cover with a large bowl, but since I don't have that much counter space, I put it in the bowl and covered it with a damp towel. Here's the dough before rising:

And here it is after doubling in bulk.

The fist there belongs to The Daughter, who was tickled at the concept of punching down the dough. Now you let it rise a second time, again to double in bulk. While the dough is rising, you have plenty of time to get the tomato mixture ready and do some other topping preparation. Here's Your Fearless Narrator, frying up some bulk Italian sausage for the pies:

(Hey, why don't chefs wear overalls? You get lots of pockets for holding thermometers and utensils and whatnot, they pretty much eliminate the need for an apron, and you can hang a towel off the hammer-loop. The stuff I think of....)
Finally, the dough is done with its second rising, which turns out to take less time than the first:

That red mixing bowl on the right contains my tomato mixture. The recipe calls for a large can of plum tomatoes, but I prefer smaller chunks, so I went with two 14-oz. cans of diced tomatoes, to which I added some garlic, basil, oregano, salt, and pepper.
We punch it down again, and then start putting it into the pans. These are regular nine-inch cake pans. You rub them with oil, dust them with cornmeal (the recipe doesn't call for this, but I did it anyway), and then plunk half the dough into each. Then you just use your fingers to "smoosh" it out, right up the edges of the pans, like so:

Here's one area I would do differently next time: I didn't smooth it out quite thin enough, especially in the corner where the bottom of the pan ends and the side begins. This resulted in quite a thickness of crust at that point of the final product. But hey, live and learn!
By this point, most of your work is done, as long as you've observed the cooking principle of mise en place. (This means having everything chopped, diced, sliced, and prepped before you get to the final assembly of whatever dish you're doing. Nothing sucks like having everything almost ready to go, and then realizing that you've forgotten to dice the onion or whatever.)
With Chicago-style deep dish pizza, your cheese goes in the bottom of the pie. You tile the slices, like so:

Here, too, an opportunity for improvement next time: I probably should have made my slices thinner, so I could use more of them for a better tiling effect. Not a huge thing, but one of those little touches that probably would have made the final product slightly more refined. That gets added to the memory bank for next time.
Anyhow, now is when we add the "toppings", even though with this pizza they're more properly thought of as "fillings":

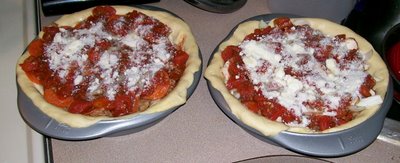
On the left we have pepperoni and Italian sausage; on the right we have Italian sausage, mushrooms, and onions. Now's the time to pour the tomato mixture on top:

When this is done, you may think with alarm that you don't have enough tomato mixture. Don't worry about it. It'll smooth out in the baking process. Now we simply sprinkle fresh Parmesan cheese over the top, drizzle a bit of olive oil over each pie, and we're ready for baking!

Deep dish pizza takes quite a while to cook. I baked them for about forty minutes, side by side, in a 450-degree oven. And after you bake them, it's essential that you let them rest outside of the oven for at least ten minutes before slicing. Once a deep-dish pizza attains the proper temperature in the middle (180 degrees), it will hold that temperature for quite some time. You want it to cool a bit so that the liquids resolidify a bit.
I also had a problem with grease running off the top of the pies, and onto the rack below. This filled the apartment with smoke, so on a very cold night, we had to open the patio door and some windows. You can probably alleviate this by putting some water in a cookie sheet and putting it on the rack below, but I didn't try this, and I'm a little concerned about how any resulting steam would affect the pizza.
But anyhow, once the smoke cleared, we had a wonderful final product. Behold:

As I said above, the crust was a bit too thick at the corner edges. Also, I'm considering next time substituting melted butter for the olive oil in the dough recipe, in hopes of a flakier texture. This is my usual practice with new recipes: I do it exactly the way the book says to do it, but when I make it a second time, that's when I start tinkering with it.
The proof, though, was in the eating, and all pronounced it delicious. So there you have it: I can make my own Chicago-style deep dish pizza. How awesome is that!
(And no, it is not a casserole. Anyone who says it is can bite me. It's a pie, not a casserole. No disagreement with me is possible on this point.)

I think I'll call it a casserole just for the opportunity to take a big chomp out of your leg.
ReplyDeleteDoes look yummy though, no matter what you call it. NOT one I'd want to get hit in the face with, however.
NOT one I'd want to get hit in the face with, however.
ReplyDeleteHeavens, no! For one thing, it weighs several pounds when fresh from the oven! The impact would be brick-like.
I never thought about deep dish pizza before. And then I read this post. And now I want to make the one on the right. Mushrooms and cheese. And onions and oh my GOD THAT SOUNDS GOOD!!!
ReplyDeleteIn reading over this posting a second time the line that struck me most was about your "long term wish list." I recently ran across an old sheet of notebook paper on which I had written my wish list when I was in my 20's. Amazing to see what was important to me then. The funny part is that eventually I DID get every single thing on that list, many of which I no longer have and don't even consider important anymore (like a waterbed).
ReplyDeleteI believe there is power in writing down what it is you want to achieve or acquire.
So what do you want? What are you willing to do to get them? What are you willing to no longer do to get them?
I've found that many times actually HAVING stuff isn't near as fun as I thought it would be when I was longing for it and anticipating getting. Sadly, I lose interest in some acquisitions depressingly soon after their arrival. Still, there are a few item (wireless laptop, digital camera with exactly the features I wanted, GPS receiver, really good set of cookware) that have continued to make me smile.
Next on my wish list? A bathtub big enough for two people to share comfortably.
Ooooh, this post is like food porn. Thank you for the great descriptions and pictures! I am truly inspired.
ReplyDeleteThat's a nice looking crusted casserole you've got there. :-)
ReplyDelete